Makerbot 2x extruder mod
The shoulder bolt is 10 mm length 4 mm OD shoulder, 4 mm length M3 thread, and standard socket cap 6 mm dia, 3 mm high - McMaster part number seems to be A I'm tight-fisted - must be my Scots ancestors. Can you please reply and tell us how long of an M3 Flat Head Cap screw? I just need to now the length.
It may be overkill, but stronger is probably better in the case of these parts. How are you supposed to install the bearing? There is no pin like your drawings. All I got was a bevelled hole. Need an extra screw? Also, what length of screw should i order? Is there anyway someone could print these and send them to me?
It's a catch 22, I can't fix it if I can't print with it. Yeah so for me these didn't work as is, at least not with the springs sold by Makerbot for the upgraded extruder.. The spring seems to be a bit too small length wise , and wasn't providing enough tension.
We'll see tomorrow if it worked well enough to make it through a large print it's been jamming with the old extruder due to any slight imperfections in the plastic. The MakerBot spring will not work well. It is not long enough and probably a bit too thin of wire. If you check out the Instructions section of this thing, you'll see that I spec'd out a spring from McMaster Carr that works very well for myself and others.
It is McMaster-Carr part number K5. This does not fit a Creator 2X. Bearing shaft is too thick, bearing pocket is too small. Body is too thick. We tried to take the right side and mirror but TInkerCad gave us garbage resolutions!
We are modifying your design to use a bushing and will upload and credit your design once we get it working well. I've had multiple requests for the left side files, but I never actually drew up the left side.
Maintaining changes gets cumbersome if they have to be done in multiple places, and it's not really necessary when the only difference is that one is mirrored. This is really nicely done. I really appreciate the attention to detail such as the McMaster and bit sizes for the holes. Everything fit perfectly and worked great. I have been using whpthomas' upgrade previously which was great but I wanted a few changes that yours addressed. When I get a jam I usually pop out the spring and use a wire brush to clean the drive wheel which is easier to do with this design due to the clearance.
I removed the outer spring brace to accommodate the springs I had and to make it easier to remove. I also added a screw for the bearing since the pin snapped off. If my mods work out I will upload the remix. Converted my 2x after having a lot of issues with air prints. It has been printing without fail for 2 days now.
I opened the stock spring block while replacing it, and the little spring inside looks pathetic. Should have done this much sooner. I'm a bit worried about using ABS in the extruder head, as the 2X with its enclosure will run hotter than the 2, so I'm thinking about getting an aluminium version of this design.
Fot now I'm very happpy with it though. I would encourage everyone to try it themselves and prove me wrong on that. I print ABS with the top cover off and the door open and my prints come out much better than they ever did while enclosed. It was seriously a night and day, face-palm, "why didn't I try that before? It took me forever to try it, since I also just took it for given that ABS prints should be enclosed. For tall and skinny parts I also use active cooling. I don't think layers have adequate time to cool and solidify otherwise, and this is what was causing bad edge curling and warping for me.
Metal would undoubtedly be the best material for the drive block, but ABS should be absolutely fine. I believe even the stock one is made of ABS. I have over hours of print time using printed extruder designs with no temperature related issues.
The upgrade has been working great so thanks for that, although using it my prints are seeming to have a lot of extra filament zits on the prints.
Have you heard others having similar success with removing the cover? We have a couple R2X's on campus that are having curling issues that may be interested in trying it. But you should be aware of that if you are printing in a semi confined space.
As for the metal drive block idea, we're excited to try out this upgrade in ABS, and if it works we'd be very interested in helping out with making a metal one. If someone does the design work, we have CNC's that could make it and we'd be happy to test it out and report back.
I have not heard anything from others printing without the cover, but I'm definitely a believer. More air flow seems to give me much better results, provided that there is very good adhesion to the build plate. If the adhesion is poor, it will likely cause edges to peel up worse than they would with the cover on, but the rest of the print is very much improved. To get the best possible adhesion and surface finish, I use an etched glass build plate wiped with ABS juice. This sticks so well that it won't come off at all until the plate cools and then the parts pop off by themselves.
It's the best solution I've found to this point. I then stuck it to the stock platform at the corners using 4 small pieces of 3M VHB tape. Works great, good adhesion, very smooth flat finish, and the parts pop right off once the plate cools down.
I should create a "Thing" for that as well. I've been having build plate issues with my rep 2x. That seems like a good solution. Does the tape seem to out gas much when heated smell really bad?
Are you fitting these to a Rep1 Dual? If so I'd be interested to hear whether you tried it and how it's working out. Would you happen to have these files as. I'd like to do some modifications in SolidWorks and. I have included the files as STEP files. SolidWorks plays more nicely with these than with STL files. Very nice solution, I really like what you have come up with. Not owning a 2X iI was never able to fully test my upgrade, so I am very pleased to see the improvements you have made - they look very sensible.
You still might want to publish a version where the bearing axle is actually a metal cap screw - it can be hard to get vertical rods to print strong enough - particularly for less experienced users. Thank you for your praise, and for your work that led up to this design.
You should know that the set pictured was printed using your 2X extruder design! If you don't actually have a 2X then I'm thoroughly impressed with what you came up with. I couldn't count on my fingers and toes how many times the calipers came out to measure dimensions on the bot itself while doing the CAD work.
As far as your suggestion for using a cap screw to mount the bearing, that is a good idea. It would even be an easy mod to a print of the existing design.
Then chamfer the hole in the cover piece to accommodate the head of a 4mm flat head cap screw. Then it could be screwed right through the bearing into the plastic of the arm. Say thanks by giving rmcniff a tip and help them continue to share amazing Things with the Thingiverse community. We're sure rmcniff would love to see what you've printed.
Please document your print and share a Make with the community. Say thanks and help rmcniff continue to share amazing Things with the Thingiverse community. You'll need a PayPal account to tip rmcniff. Click the button below and you will be redirected to PayPal. Once the payment is complete, you'll be brought back to Thingiverse. Tip Designer Report Thing. Replicator 2X Extruder Upgrade by whpthomas. Liked By View All. Give a Shout Out. Requires no extra hardware for mounting the bearing.
The mounting pin is included in the design, as it is in the Replicator 2 upgrade. If your extruder clicks and does not extrude, it you likely have too much spring tension. In this case, swap the spring for a weaker or shorter one. It helps to print both the left and the right at the same time so that the details of the smaller top come out better Print the arm pieces. I used ABS with 2 shells, 0.
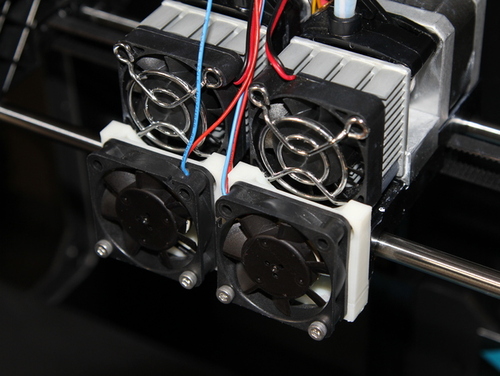
Again, it helps to print both the left and the right pieces at the same time to allow cooling between layers Finishing the parts: If you don't have the bits listed, any close approximation should work fine NOTE: Install the stepper motor into the Makerbot gantry and check the alignment of the lower guide hole with the hot end entry hole See photo.
If alignment is off, you may need to re-shape the hole with a drill bit, or re-print the part scaled up to allow for part shrinkage. Ensure that the drive gear also properly aligns with the lower guide hole. If not, loosen the grub screw and slide the drive gear to the desired position on the stepper motor shaft and re-tighten Unmount the stepper motor again, and fully assemble the drive block as shown in the photos, using the M3 screw in the base only, and the shoulder bolt as the arm pivot through all three parts.
Re-install the stepper motor with the fully assembled drive block back into the the Makerbot gantry. Re-connect the cooling fan and stepper motor wires Enjoy failure-free printing! More from 3D Printer Extruders view more.
By downloading this thing, you agree to abide by the license: Creative Commons - Attribution - Share Alike. Download All Files kb zip file. App Info Launch App. How come when i click on instructions nothing happens and i can't see them anywhere? Considering i wouldnt be needing the stock screw that held on the original part i just took my dremel and cut it off at about 8mm. No need to go out and get another m3 8mm screw. I just installed, works great it seems.
Zits or blobs aren't going to be caused by the drive block. I mostly only see them when using a bowden setup due to the hysteresis in the tube. However, they can be caused by a lot of other things, such as using poor quality filament that contains air bubbles, or using filament that has absorbed too much moisture from the air. If the blobs occur while the hot end is moving I would suspect one of those two things. If your filament has absorbed moisture, you can dry it out in an oven for several hours at low temperature.
Also, what is your nozzle diameter? The nozzle oozes even while not extruding, which can cause a blob when it comes back in contact with your part. Finally, I would not print ABS at This doesn't seem nearly hot enough to me to get good adhesion between layers, and I'm surprised it is even coming out of your nozzle fast enough.
I usually print ABS around I got it all fixed, not sure what it was but it was my printer not anything else. Deleted the edited comment. Well, this fixed the problem we had with some filaments that were picky on which extruder we used them in. Home depot has the screw and spring locally. Not all locations carry them but here is what I found locally their web site is pretty precise on inventory for even the smallest of parts and locations They do look like they want to pop out but they haven't yet.
With both extruders now installed, and having printed a ton small to large, simple to complicated , we haven't had a single failure and the springs I used, even a little larger than recommended, haven't caused any issues.
Hi, I like your design, however I have found a bit of an inconsistency The size and thickness is almost exactly the same as the original Replicator 2X one. All of the stock screws should work fine.
Did you maybe print it scaled up in size? You seem to be the only one so far that has had an issue with this. NHSE , wondering the same thing. Has anyone tried this on the Rep 1 Dual? I see it mentioned below but no word on fit and function How are you getting those settings for printing, adjusting the density of the support material?
Are you using MakerWare? Your suggestion of breaking off the peg and drilling a hole for the bearing seems easy and okay for people who have already printed the model.
I wondering if you have a version for 9 mm OD extrusion driver instead of 12 mm? Make sure the thermal barrier tube metal cylinder that screws into the heater block isn't inserted too far into bar mount.
I initially made this mistake and the new extruder drive block was at and odd angle because of this. I didn't have a spring of adequate strength, so I folded two together and that seemed to do the trick. The future is Open Source software, hardware, everything.
This ability to modify and even improve on the original design is glorious! I feel so dumb. I printed them using Nylon. Would it be possible to get the Extruder Arm L. STEP file I'd actually like all the. I"m trying to add an extension to the Extruder Arms.
If I can explain it correctly as follows. I'm using Master Cam to add an extension with a hoop that is not closed. But has wings that can be pinched to slightly open the hoop. I plan to have the guide tube latch into that. What about printing 1. It is not a joke, is my configuration: I have not measured the screw needed yet but will post when I get to that bit.
The shoulder bolt is 10 mm length 4 mm OD shoulder, 4 mm length M3 thread, and standard socket cap 6 mm dia, 3 mm high - McMaster part number seems to be A I'm tight-fisted - must be my Scots ancestors. Can you please reply and tell us how long of an M3 Flat Head Cap screw? I just need to now the length. It may be overkill, but stronger is probably better in the case of these parts. How are you supposed to install the bearing?
There is no pin like your drawings. All I got was a bevelled hole. Need an extra screw? Also, what length of screw should i order? Is there anyway someone could print these and send them to me? It's a catch 22, I can't fix it if I can't print with it. Yeah so for me these didn't work as is, at least not with the springs sold by Makerbot for the upgraded extruder.. The spring seems to be a bit too small length wise , and wasn't providing enough tension.
We'll see tomorrow if it worked well enough to make it through a large print it's been jamming with the old extruder due to any slight imperfections in the plastic.
The MakerBot spring will not work well. It is not long enough and probably a bit too thin of wire. If you check out the Instructions section of this thing, you'll see that I spec'd out a spring from McMaster Carr that works very well for myself and others.
It is McMaster-Carr part number K5. This does not fit a Creator 2X. Bearing shaft is too thick, bearing pocket is too small. Body is too thick. We tried to take the right side and mirror but TInkerCad gave us garbage resolutions!
We are modifying your design to use a bushing and will upload and credit your design once we get it working well. I've had multiple requests for the left side files, but I never actually drew up the left side. Maintaining changes gets cumbersome if they have to be done in multiple places, and it's not really necessary when the only difference is that one is mirrored.
This is really nicely done. I really appreciate the attention to detail such as the McMaster and bit sizes for the holes. Everything fit perfectly and worked great. I have been using whpthomas' upgrade previously which was great but I wanted a few changes that yours addressed.
When I get a jam I usually pop out the spring and use a wire brush to clean the drive wheel which is easier to do with this design due to the clearance. I removed the outer spring brace to accommodate the springs I had and to make it easier to remove. I also added a screw for the bearing since the pin snapped off. If my mods work out I will upload the remix. Converted my 2x after having a lot of issues with air prints. It has been printing without fail for 2 days now.
I opened the stock spring block while replacing it, and the little spring inside looks pathetic. Should have done this much sooner. I'm a bit worried about using ABS in the extruder head, as the 2X with its enclosure will run hotter than the 2, so I'm thinking about getting an aluminium version of this design.
Fot now I'm very happpy with it though. I would encourage everyone to try it themselves and prove me wrong on that. I print ABS with the top cover off and the door open and my prints come out much better than they ever did while enclosed. It was seriously a night and day, face-palm, "why didn't I try that before? It took me forever to try it, since I also just took it for given that ABS prints should be enclosed.
For tall and skinny parts I also use active cooling. I don't think layers have adequate time to cool and solidify otherwise, and this is what was causing bad edge curling and warping for me. Metal would undoubtedly be the best material for the drive block, but ABS should be absolutely fine. I believe even the stock one is made of ABS. I have over hours of print time using printed extruder designs with no temperature related issues.
The upgrade has been working great so thanks for that, although using it my prints are seeming to have a lot of extra filament zits on the prints. Have you heard others having similar success with removing the cover? We have a couple R2X's on campus that are having curling issues that may be interested in trying it.
But you should be aware of that if you are printing in a semi confined space. As for the metal drive block idea, we're excited to try out this upgrade in ABS, and if it works we'd be very interested in helping out with making a metal one. If someone does the design work, we have CNC's that could make it and we'd be happy to test it out and report back.
I have not heard anything from others printing without the cover, but I'm definitely a believer. More air flow seems to give me much better results, provided that there is very good adhesion to the build plate. If the adhesion is poor, it will likely cause edges to peel up worse than they would with the cover on, but the rest of the print is very much improved. To get the best possible adhesion and surface finish, I use an etched glass build plate wiped with ABS juice.
This sticks so well that it won't come off at all until the plate cools and then the parts pop off by themselves. It's the best solution I've found to this point. I then stuck it to the stock platform at the corners using 4 small pieces of 3M VHB tape. Works great, good adhesion, very smooth flat finish, and the parts pop right off once the plate cools down.
I should create a "Thing" for that as well. I've been having build plate issues with my rep 2x. That seems like a good solution.